Handheld chess console designed from the groundup
♜ Chess console
Contents
- Summary
- Components
- Project plan
- Chapter 1 - Firmware and basic setup
- Chapter 2 - E-ink display install
Summary
I started to learn and play chess during Covid. I am nowhere near "good", my rating is somewhere between 1000-1200 range. Still, the game fascinates me and I would like to practice and develop. I am playing casually on lichess.org and chess.com but playing there requires me to lock in a specific window of undistrupted time. With my family life, I often being distracted, so having a 20-30 mins pure undistrupted time is rare and challening. I need a solution so I can play long-form games, analyze my moves, think through positions.
The solution I am hoping to do bring to life is a handheld chess console. There has been chess handheld devices issued since the 90s, one can find a lot of them on ebay, but with the capabilities of mobile phones they became instinct.
On the other hand, with recent microcontroller development, there are extremelyt powerful yet tiny chips, which enable us to run even the latest version of Stockfish with absolutely reasonable compute time. Having said that this is a live project documentation , my attempt to build this fantasy handheld console , for fun and (mental) profit.Components
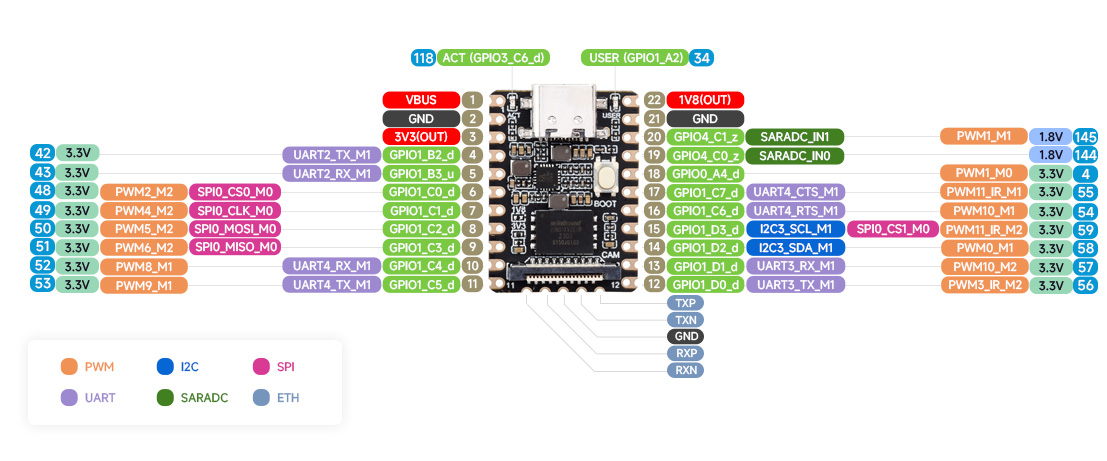
- CPU/Mainboard: Luckfox Pico Mini B - $6.99 - Product page | Wiki
- Display: Waveshare 2.13" e-Paper - $14.99 - Product page | Wiki
- Input: 4x4 matrix keyboard - $4.50 - Product page
- Battery and charging board: not sure yet
Project plan
- Confirm that devboard can host and run Stockfish with reasonable speed and performance
- Flash image to SD Card
- Push stockfish armV7 to it
- Test some Stockfish UCI codes
Chapter 1 - Firmware and basic setup
First, I will setup the Luckfox Mini B to have a fresh Ubuntu install booting from the SD card, setup connection with my PC, and share my Internet connection via USB so I can run installs and updates on the devboard. This will come handy during later stages of the development process.
Firmware install
After consulting the Luckfox Wiki page, I have:
- I have decided to work on my Windows PC as I had difficulties installing an RNDIS driver on my M1 macbook, and my linux setup is currently in a not-so-nice state ( playing with Arch and different window managers left my linux install in a nearly useable state ).
- Downloaded and installed RK DriverAssistant
- Downloaded the Ubuntu firmware files created by Luckfox. This is going to be a much heavier choice of OS to run on an embedded applicatioin like this, and I suspect later down the road it will spawn a side project how to minimize resource utilization to the minimum in order to maximize battery life. For now on the other hand, it is a major bootstraper as I can swiftly install packages and libraries while experimenting, using apt
- Downloaded the SocToolKit flashing tool and following the instructions on the Wiki I was able to flash a new Ubuntu distro into a 16G SD card in a coupel of minutes
- Inserting the card to the devboard and power it up with a USB-C cable attached to my Windows 11, it has booted up in a few seconds ( TODO: measure boot time and research how can I optimize it )
Login and networking
At this point I could access the devboard either via ADB, and android device management utility, or SSH. I will need both so I setup both:- for ADB; I download and unpack the Android platform tools and I add the path to my Environment Variables so I can call it anywhere in my terminal
Now I can just adb shell to gain direct shell access to the devboard from my Win terminal - for SSH it's more complicated. The devboard ( the Ubuntu distro ) ships with a harcoded static IP setup, so it will always try to show up on your windows under 172.32.0.70. See Login for Luckfox Pico.
This creates an issue: if I want to share my internet connection via Windows 11, Windows is forcing a particular IP range to be used , under 192.168.137.x
In order to fix it , I need to change the network configuration on the devboard, so when it boots up and activates the USB networking, it asks for an IP from my PC using DHCP , instead of pushing for the hardcoded one.
- Using grep -R "172.32.0.70" /etc /usr /opt 2>/dev/null I scanned my startup scripts to find where the static IP is assigned. It was under /etc/init.d/S50usbdevice
run_binary()
{
        if [ $MTP_EN = on ];then
                start-stop-daemon --start --quiet --background --exec /usr/bin/>
        fi
        if [ $RNDIS_EN = on ];then

        sleep .5
        #ifconfig usb0 172.32.0.70 #< I have commented this one out
        ifconfig usb0 up
        dhclient usb0 #< I have added this
        fi

}
Chapter 2 - E-ink display install
Next I had to connect the e-ink display to the devboard and run a test script to confirm it is properly hooked up. Before I get to the details, a few words about why I chose an e-ink display over an LCD or LED display.
I choose an e-ink display for two main reasons:
- e-ink displays consume a fraction of energy compared to the LCD/LED displays, as they only need energy when we update something
- this also leads to the second, even more important feature: e-ink display store their state - the image displayed - until "infinite" time, kind of like paper, even if the whole device is powered off.
Luckfox Pico Mini A/B pin diagram